venerdì 30 luglio 2021

You Make Me A Happy Camper By Marj Banzales

 Hi crafty friends! 

Marj here and I'm glad you're here. Today, I have another card to share with you. For my project today, I used the Teddy Mountain Digi Stamp.


Isn't he adorable? This digi stamp can be purchased at her Etsy Shop for a very affordable price.

Let me tell you how I made it, let's begin....


To start with, I printed the image in black and white so I can color it myself. If you are press for time, you can also print the colored version.  I printed it using my Canon Pixma TS5320 to white 110lb cardstock. I colored them using my Arteza Ever Blend Markers. Once done, I set it aside to work on my background.


For my background, I cut a piece of white cardstock that measures 4 x 5.25 inches as my card panel. I decided to make a night sky background. I used several Ranger Distress Ink to create it. I first applied Black Soot, followed by Dusty Concord, and then Chipped Sapphire. I find it so amusing to blend those colors and creating a beautiful night sky. Once done, I created the moon using a penny then used a chalk marker and blend it out to achieve the look.

 
After that, I adhered my card base to an A2 white cardstock using strong glue. Next, I added some double-sided tape to my image and added it to the front of the card. 


As a final touch, I added my sentiment and used Sakura Gel Pen making some dots and added some stars. That completes the card.

I hope you like what I made today and give this a try.
I'll see you again next time and don't forget to share your project on your Instagram Account and tag Casetta Di Chicca.

Check out her Etsy Shop. She has a lot of super adorable and affordable digital stamps.

The material I used for the Project:

  • Teddy Mountain Digital Stamp
  • Ranger Ink Tim Holtz Distress Ink Dusty Cord
  • Ranger Ink Tim Holtz Distress Ink Black Soot
  • Ranger Ink Tim Holtz Distress Ink Chipped Sapphire
  • Scrapbook.com Smart Glue Liquid
  • Scrapbook.com Premium Hybrid InkPad Black
  • Scrapbook.com Double Sided Adhesive Rounds
  • Scrapbook.com Ink Blending Tool Applicator
  • Scrapbookcom Ink Blending Domed Foam
  • We R Memory Keepers Trim and Score Board
  • We R Memory Keeper Mini Guillotine Paper Cutter
  • American Crafts Cutup Scissors
  • Recollections White 110lb Cardstock

XOXO

Marj


giovedì 22 luglio 2021

Happy Camper Teddy card II DT Anirudh

Hi crafty folks!

Today, I have an amazing 3D card to share with you all... 

I used the Teddy Mountain Digi stamp created by Sabrina, which you can find on her Etsy shop.


Let me show you how I put up this card together,


To start with, I printed the colored Digi 4 times and then cut it as per 4 layers from back to front, keeping the backmost layer intact.


Then, I took double-sided foam tape and put them at the back of all three cut pieces.


Then I took a black card base and started to layer the pieces from back to front. I used glue tape for the background piece as the card was getting very bulkier!

Finally, I adhered a sentiment and some black adhesive rhinestones to complete the card.

I hope you like my 3D card and give this a try.

See you again soon and until then, keep crafting!

Materials used:-

1. "Teddy Mountain" Digi stamp

2. Martha Stewart spring-loaded scissors

3. Scotch double-sided adhesive foam tape 1/2"

4. Black card base 300GSM

5. Scotch double-sided adhesive tape 1/4"

6. MFT Happy Campers stamp set

7. Black adhesive rhinestones

Splash..il nuovo tormentone dell'estate a card by ilCiecoFuffo


 Ciao a tutte Ragazze e Ragazzi eccomi da voi con una nuova Card per Chicca, in questo mese già caldissimo ho colorato per voi la Voce che darà vita al vostro tormentone estivo "Splash" by...ogni estate cen'è uno, c'è una canzone che a forza entra nelle nostre teste e senza pensarci intoniamo anche fischiettando, beh questo è il tormentone firmato La casetta sull'albero di Chicca!💁‍♀️

Come prima cosa ho stampato il digital stamp ... su carta per markers e poi colorato con u copic e successivamente rifinito con penna gel bianca.

Ho Mascherato la cantante con carta apposita e  timbrato ed embossato a caldo lo sfondo a tema musicassette su cui ho dopo sfumato i miei distress oxide.


A questo punto ho ridimensionato la card tagliandola e le ho creato una cornice viola che riprendesse la tonalità dei capelli e  creato degli schizzi di color bianco per dare una sensazione più forte di splash🤣🤣

Bene siete pronti a cantare con noi tutta l'estate???

Vi aspetto per qualsiasi commento e vi mando un bacione enorme

il vostro

CiecoFuffo

MATERIALI USATI:

  • PC Asus
  • stampante Canon PixmaTS8350
  • carta Transotype
  • cartoncino viola 220g Canson
  • Copic markers
  • penna gel bianca Pentel e Copic line pen 0,3
  • carta per mascheratura inkadinkando
  • art stamp by Carabelle studio "K7"
  • polvere da embossing "Bride" by Tsukineko
  • embossing tool
  • tempera bianca e acqua
  • taglierina a ghigliottina A5 Tim Holtz for Tonic
  • biadesivo
  • Distress oxide: squezed lemonade, tumbled glass, broken china, mermaid lagoon
  • Taylored brush

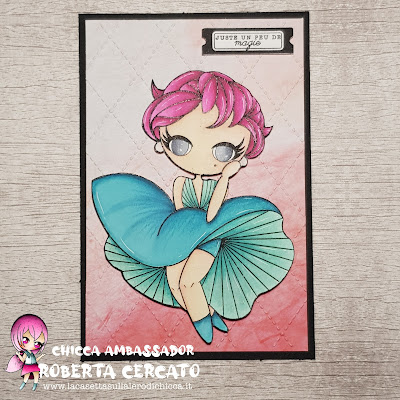
Card "Una magica Marylin" by Roberta Cercato - robyscrap


Ciao a tutti!!!
Ecco il mio progetto del mese per La Casetta sull'Albero di Chicca, una card con una simpatica Marylin Monroe.

Per prima cosa ho stampato il digital stamp su cartoncino adatto all'utilizzo dei pennarelli ad alcool


e l'ho colorato con gli Spectrum Noir e poi ritagliato.
Successivamente ho tagliato un pezzo di cartoncino colorato (circa 4"x 6") e un pezzo di cartoncino nero poco più grande del primo.
Ho poi embossato il cartoncino colorato con una fantasia geometrica.


Ho incollato il digital stamp utilizzando del biadesivo spessorato per dare l'effetto 3D.
Infine, ho timbrato un sentiment che ho incollato con del biadesivo spessorato.

Questa è una card semplice da realizzare, ma l'effetto finale è davvero molto bello!

Vi aspetto il prossimo mese per un altro progetto,
Roberta


Materiale utilizzato:
- digital stamp Marylin Monroe
- cartoncino adatto all'utilizzo dei pennarelli ad alcool
- pennarelli ad alcool Spectrum Noir Classique
- cartoncino colorato
- cartoncino nero
- taglierina
- colla
- forbicine
- biadesivo spessorato
- fustella per embossare il cartoncino 


giovedì 15 luglio 2021

Cute Summer Panda by Il Mondo di Ross

Cute Panda Summer

Buongiorno a tutti! Oggi a tenerci compagnia c'è un tenerissimo Panda,il nuovo timbro digitale che trovate sullo shop della Casetta sull'albero.


Ho creato una tag , fustellando per prima cosa il bazzil bianco.


Poi ho scelto le carte da utilizzare per il mio progetto, e l'effetto che volevo dare come sfondo.

 
Ho stampato il timbro digitale sia colorato sia in bianco e nero , ed ho scelto di ritagliare il primo.


Così ho creato il mio cerchio scegliendo il colore fucsia ,e la fustella freccia di colore dorato.


Ho iniziato ad incollare le parti,creando un po' di spessore alla mia tag, sia per il cerchio sia Per il timbro.
Infine ho aggiunto il sentiment "happiness" e abbellito con una mollettina la parte superiore della tag.

Alla prossima XXX
Rossella

mercoledì 7 luglio 2021

Panda Friends by kel

 Hi friends! kel here to share my first tutorial post with Chicca! For my project today, I got to play with these adorable Pandas. Don't they look so fun and relaxed?!?


I started by printing them on white cardstock, and then coloring them up with my Copics.


After I colored the umbrella I added some shading to the whites of the pandas just to give them a little more depth. 


Then I used my 3" circle punch to punch them out. I was so happy they fit perfectly in this circle. Sometimes when I print them out I make them a little too big or small for the punches or dies I want to use. But it all works out in the end haha! 


I added another 3.5" circle punch behind it, and then matted it on some super fun summer-colored striped paper and a blue card base, and then added a stamped sentiment strip to the bottom of the card.


I also added some fun green enamel dots to the sentiment strip and to the upper left of the card to finish it off. 


So much fun... the sentiment was perfect for it too! Thanks for stopping by and hope to see you again soon!

lovies, =o) kel


lunedì 28 giugno 2021

Lallo Sea - Life is Better with Sandy Feet by Marj Banzales


Hi crafty peeps! I'm glad you're here. Today, I'll be sharing another card I made using the Lallo Sea Digital stamp. 


For my card today, I colored them using my favorite markers Arteza Ever Blend and some Glitter Gel Pens. 
I made the background using Arches Watercolor paper and used Arteza Real Brush Pens. It is so easy to replicate this project as you can use the pre-colored version of the image or if you'd rather color them up you may do so.

In making this project, I used Word Document to resize the image and printed it using my Canon TS5320 printer and printed it on a white heavy weight cardstock. After that, I colored them up.


Once done coloring, I added it to a 4 x 5.25 card base (watercolored background). Then adhered it to a top folding white cardstock. I also used My Monthly Hero June 2018 Kit for my sentiment and added scene. Isn't he cute?


 You can check this image out in her Etsy Shop and while you're at it, check as well the other images she's offering. She has both pre-colored and non-colored stamp for the price of 1. That's just amazing and really affordable.

I hope you like what I made and hope to see you again next time.

XOXO
Marj

lunedì 21 giugno 2021

My first DT Project - Surfs up! By Anirudh

 Hi everyone!

I'm Anirudh and I'm super happy to be a part of this amazing team!

And today, I'm sharing a cute card with you all...

I'm using the surfer boy from the new Surf grain digital stamp created by Sabrina, which you can find on her Etsy shop.

To start with, I colored the image with my Copic sketch markers and then fussy cut them out without any white border and then for better finishing, used a black brush tip pen to color the edges.

Then, I took a blue cardstock and die cut several waves out of it using a big shot and wave dies, and also added a little ink blending for depth using distress inks.

Using orange watercolor patterned paper, I created a summer sunlit sky and added the waves over it. Using a border die, I die cut this out and then added it to a black A2 card base.

Now, using foam squares, I attached the surfer boy atop the waves, added the sentiment, drew some birds in the sky, and finished the card with a few clear iridescent sequins.

I hope my card inspires you to create using this lovely Digi stamp! See you all soon and Keep crafting!!!

Materials used...

1. "Surf Grain" Digi stamp

2. Copic sketch alcohol markers

3. Martha Stewart spring-loaded scissors

4. Faber Castell Pitt Artist brush pens Soft Brush 199

5. Mudra Sky Blue cardstock

6. Lawn Fawn Ocean hillside pop-up add-on die

7. Lawn Fawn Ocean waves accents die

8. Distress inks: Broken China and Mermaid Lagoon

9. Blending tool and foam

10. DevArts Watercolor pattern paper

11. MFT Wonky Stitched Rectangles dies

12. Neenah solar white 110Lbs

13. Scotch foam squares

14. Black fineliner 0.2mm

15. Studio Katia Crystal clear sequins

Find all the digital stamps of the house on the gem tree in the Etsy shop
Cumulative june… HAPPY SUMMER

 hello friends, here are the creations of my amazing girls for the cumulative post of june ! I love how girls use digital sweets in their cards !!  I hope they can inspire you! 


I remind you that you can find all the stamps in the Etsy shop

Kel has created a splendid card with the cute Ariel


 Roberta made a very nice card using Bunny summer


Diana “cieco fuffo” has made a wonderful card with the sympathetic  Lallo sea


all digital stamps are waiting for you in the shop !!!
Xoxo team la casetta sull’albero di Chicca

mercoledì 16 giugno 2021

Tra le onde. memorydex card by ilCiecoFuffo


Buongiorno a tutti io il caldo é ormai arrivato e tutti cominciamo a sognare spiaggia e mare...o quasi tutti. 😅
L'ultima realise di timbri di Chicca è all'insegna del mare e delle vacanze l'avete vista? Proprio da questa nuova collezione ho preso il timbro digitale utilizzato oggi, questo atletico Ippo ( Lallo sea) con la sua tavola da surf.
Questa volta non ho realizzato una card normale ma una memorydex, era una vita che volevo iniziare a farne e perché non iniziare con qualcosa piena di sole e mare?
Ma  cominciamo...
Per prima cosa mi sono ritagliata la base della card, io ho dei file comprati tempo fa, ma ce ne sono anche in giro svariati free, o perché no si possono ritagliare a piacimento.
Seconda cosa ho stampato il mio soggetto su carta per markers e l'ho colorato con Copic.


Per creare lo sfondo delle onde le ho prima disegnate su due Bazzill, uno azzurro e uno bianco, e poi ritagliate.


Ho aggiunto poi dei tocchi di luce sulla cresta delle onde con un brillogel color oro sberluccicosissimo


Ed alla fine ho creato dei particolari per rendere il movimento delle onde usando la penna gel bianca e nera


A questo punto ho incollato i pezzi, compreso il mio Ippo stratificandoli e creando vari livelli usando il biadesivo spessorato


Non poteva mancare un sole splendente naturalmente, l'ho creato con un punch tondo, incollato su un cartoncino di un colore più scuro e ritagliato a mano. I particolari sono fatti con una copic pen e gel bianca ed il bordo esterno l'ho distressato o meglio mosso con il distress tool di tim holtz.


Per rendere meglio l'idea di giornata soleggiata ho attaccato delle paillettres giallo fluo con il glossy accent.


Sulla base ho voluto creare un effetto bagnasciuga in cui si trovano sempre intrappolate un sacco di conchiglie. L'effetto bagnato è ottenuto sempre con il glossy con cui ho fatto anche piccole gocce d'acqua sulle onde e altri piccoli particolari.


Bene ho finito Amiche e Amici, la mia collezione di memorydex card è appena iniziata, e voi amate questo tipo di realizzazioni?
Mando a tutti un mare di baci
il vostro
CiecoFuffo


Materiali usati
  • Digital stamp  Lallo sea
  • Carta Transotype
  • copic color e pen
  • penna gel bianca e nera
  • biadesivo spessorato
  • tessa biadesivo a nastro
  • Bazzill Aqua e White and yellow
  • paillettes
  • Glossy accent by Ranger
  • Doodlebug patterned paper
  • Brillogel Oro by Tommy art
  • forbici Tim holtz by Tonic e cutter
  • punch1,5" cerchio by Artemio
  • distress tool by Tim Holtz