venerdì 30 aprile 2021

Si te stessa...de il CiecoFuffo


Buongiorno Ragazze per il progetto che ho realizzato questo mese ho usato un timbro romanticissimo "Chicca wood", da quando l'ho visto ho subito sperato di poterlo colorare per il team...e se ancora non lo sapete adoro fate , elfi e tutte queste dolcissime creature, mi ispirano tantissimo. 
Ma bando alle ciance vediamo come ho realizzato questa card. Prima di tutto ho lavorato il disegno con Photoshop per comporre le varie parti, ho voluto aggiungere altri fiori perché, si lo ammetto, sono un'altra mia passione, e qualche stellina presa da un altro timbro "Chicca Moon".


Ho stampato poi su carta per markers e su un foglio di carta per mascheratura e via alla colorazione con i Copic. E Ve lo dico, è la prima volta che coloro una bionda...ho sudato!! Per i fiori mi sono ispirata ai colori esuberanti dell'ibisco, un fiore tropicale ormai diffuso ma che proprio nel mio giardino non vuole sopravvivere.


A questo punto ho cominciato a lavorare sullo sfondo, avevo in mente un verde e marrone, quindi ho fatto delle prove di sfumatura con i distress oxide...ha vinto la sfumatura sulla destra ovviamente, anche se l'azzurro mi dispiace non averlo messo.
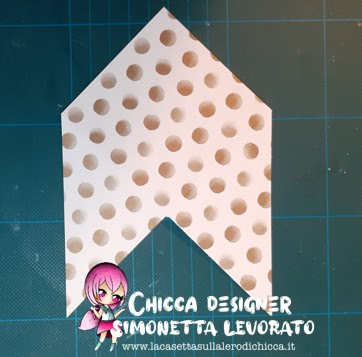
Una volta scelto il colore ho ritagliato il disegno stampato sulla carta da mascheratura e lo ho applicato sul timbro colorato ed ho cominciato la mia sfumatura, dal colore più chiaro a quello più scuro.


Creata la base del colore ho enfatizzato i bordi delle stelline e dei piccoli fiori con un po' di giallo. 
Con uno stencil di Simple Stories della collezione Fall, ho sfumato sempre con il giallo un pattern di foglie e ghiande. Dettaglio che si intravede poco: nella parte più chiara con uno stencil di My Favorite Things "Rolling clouds" ho sfumato un accenno di nuvole che si intravede fanno sotto la scritta.


Rimossa la mascheratura ho dato i punti di luce con le mie fedeli penne gel bianche e create delle ombre aggiuntive al disegno con un Copic grigio.


Ora il mio momento più travagliato, la scelta del sentiment, ma sono stata baciata dalla fortuna. Nella mia collezione, molto scarna, di timbri con scritte, ho ritrovato un set della Graphic45 che ha questo stupendo sentiment, e che secondo me ci sta benissimo!


L'ho timbrato con un nero intenso ma non calcandolo troppo per dare un effetto un pochino vintage.

Bene Ragazze anche per oggi ho finito, vi lascio ad un po' di foto per guardare meglio alcuni particolari e vi aspetto nei commenti per qualsiasi cosa vogliate dirmi. 
Un bacione dal vostro
CiecoFuffo


MATERIALI USATI:

  • PC Asus e stampante Canon PixmaTS8530
  • Carta Transotype
  • carta per mascheratura Inkadinkando
  • Copic Markers
  • Copic multiliner Sepia 0,3
  • penna gel biancaGellyroll
  • penna Hybrid gel bianca Pentel
  • cutter X-cut e forbici Tim Holtz
  • distress oxide Tim Holtz
  • Brush Taylored
  • Stencil My Favorite Things "rolling clouds"
  • Stencil Simple Stories "Fall Farmhouse"#11128
  • sentiment Graphic45 "Portrait of a Lady" stamp#1
  • Versafine Onyx Black
  • stamping tool Tim Holtz
  • editing: Photoshop e Photoroom


sabato 24 aprile 2021

Un segnalibro e un portablocco....kit degno di Jessica Fletcher - by Simonetta Levorato


Buongiorno a tutti!
Appena ho visto il digital stamp Jessica Fletcher ho pensato di creare il "kit del piccolo investigatore", un segnalibro e un portablocco.

Ecco il tutorial per realizzare il segnalibro:

Per la realizzazione del mio segnalibro sono partita da una carta patterned dove ho ritagliato un quadrato 15x15 cm e cordonato su entrambi i lati a 7,5 cm.

Ho eliminato un quadrato per ottenere  

Arrivata a questo punto ho eliminato anche i due triangoli 

Per ottenere la forma qui sotto

Sulla base interna ho incollato un quadrato di carta in tinta unita e poi il quadrato tagliato in precedenza dalla carta patterned in modo di ottenere un po' di mattatura.


Per chiudere il segnalibro ho messo il biadesivo sul triangolo destro e li ho ripiegati su se stessi 

Il segnalibro è pronto basta solo aggiungere gli abbellimenti … ho usato il mio timbro digitale che ho posizionato su un cerchio fustellato e decorato usando uno stencil e della pasta, ho aggiunto un sentiment facendo una fustellata. 
Il mio segnalibro ora è davvero pronto !!!

Per la realizzazione del portablocco sono partita da un pezzo di bazzil bianco misura 27 X 9 cm cordonato a 9-9,5-18,5-19 cm

Ho fatto un segno a 23 cm per poi tagliare il pezzo finale in diagonale.
Ho rivestito il bazzil con carta patterned tagliando due quadrati che misurano 8,5 X 8,5 cm e un pezzo 8,5 X 7,5 cm e segnato a 3,5 cm sul lato di 7,5 cm sempre per tagliare la diagonale.

Ho tagliato due cerchi che ho unito con del biadesivo spessorato per poterli far scorrere all’interno della fessura che mi sono fatta con una fustella e che serve da chiusura.


Sopra al cerchio ho incollato il mio timbro digitale.
Per il blocchetto ho ritagliato della carta da fotocopie misura 8 x 8 cm e o fatto la copertina usando del vellum dove ho stampato il timbro digitale. 


Lista materiali utilizzati:
Taglierina
Biadesivo
Colla
Carta patterned e bazzil
Fustella a cerchio 
Fustella tag
Fustella scritta Happy
Glossy accent
Pasta fluffy brilliance
Carta da fotocopie


giovedì 22 aprile 2021

Cumulative April 2021


Ciao Chicchine!! 

Siamo giunti al 20 aprile e, come ogni 20 del mese, vi teniamo compagnia con il post cumulativo! 

Roberta, Diana, Michelle e Marj hanno creato dei fantastici progetti!


Hello Chicchine !!  

We have reached April 20th and, like every 20th of the month, we keep you company with the cumulative post!

Roberta, Diana, Michelle and Marj created wonderful projects!


Roberta ci regala una card con uno sfondo pazzesco, utilizzando il digital stamp Wednesday Addams

Roberta gives us a card with a wonderful background and starring Wednesday Addams


Diana ci porta nello spazio con una card stellare con il digital stamp Chicco Space
Diana takes us into space with a star card using the digital stamp Chicco Space


Michelle e Marj ci fanno sognare con la dolcissima bambolina del digital stamp My Dreams
Michelle and Marj make us dream with the sweet little doll starring  My Dreams


Non vediamo l’ora di vedere le vostre creazioni con i timbri firmati La Casetta sull'Albero di Chicca  
We can't wait to see your creations with the stamps signed La Casetta sull'Albero di Chicca


mercoledì 21 aprile 2021

New Release APRIL 2021


Hi Friends!

with a little delay and with great emotion we present the new release of April !!!

and we lend them to you with the wonderful creations of the new DT


We can't wait to see the new release in your creations !!!


sabato 10 aprile 2021

Happy Birthday Split Gatefold Card by Marj Banzales


Hello friends! I'm glad you're back. Today, I have another Project to show you and you will enjoy looking at this cuties!

Today's tutorial is very easy. All you need is some wet glue, scissors, and a few cardstock! Oooppppssss.... I forgot, you also need a printer for this :) So let's begin!

Digital stamps are really in now and you can't go wrong when it comes to making any projects. You don't need any special machine to use it that's why I love using them! When it comes to Casetta DiChicca's Digital Stamp, you have a choice of either using the colored version or the non-colored one because that's how it was made for a fraction of a price. Isn't that great!

For today tutorial, I chose the colored version of Le Canterine and they are so fun to make but if you love to color it is also a good choice I just wanted to do a short cut although I love to do some coloring with this cuties and will probably do that on another project that I will do in the future.


To make this card, I printed the colored version and fussy cut it and left a little white border to make it look interesting and I like how it looks and then I set it aside.


Next, I cut a piece of  4.25 x 11 inches White cardstock. Then, I used my We R Memory Keepers Mini Score Board and scored it on 2 1/8 inches on each side.


Using my Fiskars Cutter, I cut the Premium Patterned Paper Confetti from DCWV in the middle that measures 2 1/8 inches x 5 1/2 inches. Now that we have the 2 pieces, I added one to the left flap and the other one to the right flap. Then, I cut 2 pieces of 2.25 x 0.5 inches and scored in half to make a hinge on each side.  I added wet glue ( make sure to use a strong one or double sided tape) to attached it to the front of the card against the edge of the gatefold. 


Next, I trace the Digital image to a white cardstock and fussy cut it. This white piece will be on the  left side of the card.


Then on the left hand side, I added a strong glue on the flap and centered my colored image then attached it and reinforced it with my bone folder. You'll see our image is the only one floating here. (as shown below)  and then on the right hand side, I added the same shape but with a blank piece. I added another strong glue on the other side of the flap and make sure the white blank piece is lined up with our image.  Now, that we created the simple blank piece, that's where we will add our surprise message or sentiment.


For the sentiment, I used Happy Birthday from the Stampin Up Endless Birthday Wishes Stamp Set. This is an old Stamp Set of mine that I always use making different birthday cards. 


This is how it looks like when it is close.


This is how it looks like when its open. Isn't this card so cute? I'm glad it looks how I envisioned it. I hope you learn a thing or two. Come check out Casetta Sullalbero for some other amazing designs she has on her Etsy Shop.

Thank you again for stopping by and when you get the chance, you can follow me on Instagram, Facebook, and my blog. Hope to see you there and see you again next time!

Marj