Visualizzazione post con etichetta #handmadework. Mostra tutti i post

venerdì 30 luglio 2021

You Make Me A Happy Camper By Marj Banzales

 Hi crafty friends! 

Marj here and I'm glad you're here. Today, I have another card to share with you. For my project today, I used the Teddy Mountain Digi Stamp.


Isn't he adorable? This digi stamp can be purchased at her Etsy Shop for a very affordable price.

Let me tell you how I made it, let's begin....


To start with, I printed the image in black and white so I can color it myself. If you are press for time, you can also print the colored version.  I printed it using my Canon Pixma TS5320 to white 110lb cardstock. I colored them using my Arteza Ever Blend Markers. Once done, I set it aside to work on my background.


For my background, I cut a piece of white cardstock that measures 4 x 5.25 inches as my card panel. I decided to make a night sky background. I used several Ranger Distress Ink to create it. I first applied Black Soot, followed by Dusty Concord, and then Chipped Sapphire. I find it so amusing to blend those colors and creating a beautiful night sky. Once done, I created the moon using a penny then used a chalk marker and blend it out to achieve the look.

 
After that, I adhered my card base to an A2 white cardstock using strong glue. Next, I added some double-sided tape to my image and added it to the front of the card. 


As a final touch, I added my sentiment and used Sakura Gel Pen making some dots and added some stars. That completes the card.

I hope you like what I made today and give this a try.
I'll see you again next time and don't forget to share your project on your Instagram Account and tag Casetta Di Chicca.

Check out her Etsy Shop. She has a lot of super adorable and affordable digital stamps.

The material I used for the Project:

  • Teddy Mountain Digital Stamp
  • Ranger Ink Tim Holtz Distress Ink Dusty Cord
  • Ranger Ink Tim Holtz Distress Ink Black Soot
  • Ranger Ink Tim Holtz Distress Ink Chipped Sapphire
  • Scrapbook.com Smart Glue Liquid
  • Scrapbook.com Premium Hybrid InkPad Black
  • Scrapbook.com Double Sided Adhesive Rounds
  • Scrapbook.com Ink Blending Tool Applicator
  • Scrapbookcom Ink Blending Domed Foam
  • We R Memory Keepers Trim and Score Board
  • We R Memory Keeper Mini Guillotine Paper Cutter
  • American Crafts Cutup Scissors
  • Recollections White 110lb Cardstock

XOXO

Marj


giovedì 22 luglio 2021

Happy Camper Teddy card II DT Anirudh

Hi crafty folks!

Today, I have an amazing 3D card to share with you all... 

I used the Teddy Mountain Digi stamp created by Sabrina, which you can find on her Etsy shop.


Let me show you how I put up this card together,


To start with, I printed the colored Digi 4 times and then cut it as per 4 layers from back to front, keeping the backmost layer intact.


Then, I took double-sided foam tape and put them at the back of all three cut pieces.


Then I took a black card base and started to layer the pieces from back to front. I used glue tape for the background piece as the card was getting very bulkier!

Finally, I adhered a sentiment and some black adhesive rhinestones to complete the card.

I hope you like my 3D card and give this a try.

See you again soon and until then, keep crafting!

Materials used:-

1. "Teddy Mountain" Digi stamp

2. Martha Stewart spring-loaded scissors

3. Scotch double-sided adhesive foam tape 1/2"

4. Black card base 300GSM

5. Scotch double-sided adhesive tape 1/4"

6. MFT Happy Campers stamp set

7. Black adhesive rhinestones

lunedì 21 giugno 2021

My first DT Project - Surfs up! By Anirudh

 Hi everyone!

I'm Anirudh and I'm super happy to be a part of this amazing team!

And today, I'm sharing a cute card with you all...

I'm using the surfer boy from the new Surf grain digital stamp created by Sabrina, which you can find on her Etsy shop.

To start with, I colored the image with my Copic sketch markers and then fussy cut them out without any white border and then for better finishing, used a black brush tip pen to color the edges.

Then, I took a blue cardstock and die cut several waves out of it using a big shot and wave dies, and also added a little ink blending for depth using distress inks.

Using orange watercolor patterned paper, I created a summer sunlit sky and added the waves over it. Using a border die, I die cut this out and then added it to a black A2 card base.

Now, using foam squares, I attached the surfer boy atop the waves, added the sentiment, drew some birds in the sky, and finished the card with a few clear iridescent sequins.

I hope my card inspires you to create using this lovely Digi stamp! See you all soon and Keep crafting!!!

Materials used...

1. "Surf Grain" Digi stamp

2. Copic sketch alcohol markers

3. Martha Stewart spring-loaded scissors

4. Faber Castell Pitt Artist brush pens Soft Brush 199

5. Mudra Sky Blue cardstock

6. Lawn Fawn Ocean hillside pop-up add-on die

7. Lawn Fawn Ocean waves accents die

8. Distress inks: Broken China and Mermaid Lagoon

9. Blending tool and foam

10. DevArts Watercolor pattern paper

11. MFT Wonky Stitched Rectangles dies

12. Neenah solar white 110Lbs

13. Scotch foam squares

14. Black fineliner 0.2mm

15. Studio Katia Crystal clear sequins

Find all the digital stamps of the house on the gem tree in the Etsy shop

martedì 15 giugno 2021

Chicco Summer surf by Il Mondo di Ross

Buongiorno a tutti , buon metà mese! Oggi è il mio turno nel mostrarvi la realizzazione del mio progetto.


Ho usato l'adorabile bimbetto che è protagonista del nuovo timbro digitale Chicco surf creato da Sabrina, che trovate sullo shop etsy


Ho colorato il timbro usando i copic per le zone della pelle, mentre per il resto i pennarelli nuvo.
Con lo stencil onde ho creato lo sfondo usando il distress oxide blu.


Con la fustella cerchio ho realizzato la base di quella che diventerà una shaker,rivestendo con acetato la parte centrale.

Dopodiché ho preso due cartoncini ,uno bianco ed uno blu. Per quello bianco ho definito il bordo in modo ondulato mentre quello blu l'ho reso a pois grazie all'uso dell'embossing folder passato sotto la Big shot.

Ho assemblato la mia shaker card e incollato in alto a destra la scritta "Summer surf" colorata in precedenza.

Spero via sia piaciuta la mia creazione,a presto 
Rossella


lunedì 24 maggio 2021

"Live a little sparkle" card by Roberta Cercato - robyscrap


Buongiorno a tutti!
Vi ricordate Lamu, la ragazza extraterrestre che ne combinava di tutti i colori al suo "tesoruccio" Ataru?
Eccola qua, un timbro digitale da colorare o già colorato!
Per il mio progetto ho scelto il timbro da colorare, che potete trovare nello shop La Casetta sull'Albero di Chicca

Ma veniamo alla realizzazione della card!

Per prima cosa ho stampato il timbro su cartoncino adatto all'utilizzo dei pennarelli ad alcool e successivamente l'ho colorato con gli Spectrum Noir.

Successivamente ho ritagliato un pezzo di cartoncino acquerellabile, circa 4x6 pollici, ho applicato del gesso bianco utilizzando uno stencil con dei disegni astratti.


Una volta asciutto ho colorato lo sfondo con i Distress Oxide, utilizzando tonalità dal rosso scuro al giallo chiaro 


l'effetto finale è questo


Bello! Mi piaceva un sacco, ma secondo me mancava qualcosa.....
Ho deciso allora di utilizzare dei timbri con dei disegni astratti e a caso (ma veramente eh!!) ho fatto un o' di timbrate utilizzando gli stessi colori di Oxide che avevo usato per lo sfondo; per il timbro con il testo, invece, ho usato il Versafine grigio chiaro.


Infine, su cartoncino bianco ho timbrato un sentiment


Ed ecco la mia card finita!


Spero vi sia piaciuta!
A presto, 
Roberta


Lista materiali utilizzati:
- timbro Lamù
- cartoncino adatto all'utilizzo dei pennarelli ad alcool
- pennarelli ad alcool (io uso gli Spectrum Noir)
- cartoncino acquerellabile di circa 6x4 pollici
- cartoncino nero un po' più grande di 6x4 pollici da utilizzare per lo sfondo
- spatolina
- gesso bianco
- stencil Polkadoodles "Land & Sea"
- Distress Oxide: Aged Mahogany, Barn Door, Fossilized Amber, Squeezed Lemonade, Vintage Photo
- Blending tools
- timbro astratto Polkadoodles "Amazing Textures"
- timbro sentiment Marianna Design


domenica 16 maggio 2021

sabato 24 aprile 2021

Un segnalibro e un portablocco....kit degno di Jessica Fletcher - by Simonetta Levorato


Buongiorno a tutti!
Appena ho visto il digital stamp Jessica Fletcher ho pensato di creare il "kit del piccolo investigatore", un segnalibro e un portablocco.

Ecco il tutorial per realizzare il segnalibro:

Per la realizzazione del mio segnalibro sono partita da una carta patterned dove ho ritagliato un quadrato 15x15 cm e cordonato su entrambi i lati a 7,5 cm.

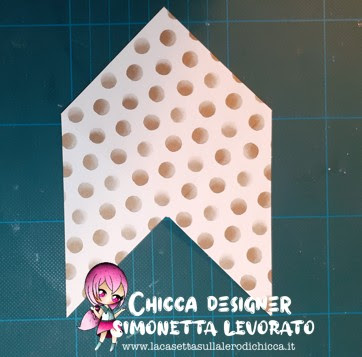
Ho eliminato un quadrato per ottenere  

Arrivata a questo punto ho eliminato anche i due triangoli 

Per ottenere la forma qui sotto

Sulla base interna ho incollato un quadrato di carta in tinta unita e poi il quadrato tagliato in precedenza dalla carta patterned in modo di ottenere un po' di mattatura.


Per chiudere il segnalibro ho messo il biadesivo sul triangolo destro e li ho ripiegati su se stessi 

Il segnalibro è pronto basta solo aggiungere gli abbellimenti … ho usato il mio timbro digitale che ho posizionato su un cerchio fustellato e decorato usando uno stencil e della pasta, ho aggiunto un sentiment facendo una fustellata. 
Il mio segnalibro ora è davvero pronto !!!

Per la realizzazione del portablocco sono partita da un pezzo di bazzil bianco misura 27 X 9 cm cordonato a 9-9,5-18,5-19 cm

Ho fatto un segno a 23 cm per poi tagliare il pezzo finale in diagonale.
Ho rivestito il bazzil con carta patterned tagliando due quadrati che misurano 8,5 X 8,5 cm e un pezzo 8,5 X 7,5 cm e segnato a 3,5 cm sul lato di 7,5 cm sempre per tagliare la diagonale.

Ho tagliato due cerchi che ho unito con del biadesivo spessorato per poterli far scorrere all’interno della fessura che mi sono fatta con una fustella e che serve da chiusura.


Sopra al cerchio ho incollato il mio timbro digitale.
Per il blocchetto ho ritagliato della carta da fotocopie misura 8 x 8 cm e o fatto la copertina usando del vellum dove ho stampato il timbro digitale. 


Lista materiali utilizzati:
Taglierina
Biadesivo
Colla
Carta patterned e bazzil
Fustella a cerchio 
Fustella tag
Fustella scritta Happy
Glossy accent
Pasta fluffy brilliance
Carta da fotocopie